👋 Hi, my name is Max Zsol.
I'm a computer engineer and writer of sci-fi, some times with the help of AI.
I also blog about writing, mindfulness, engineering leadership, mechanical keyboards, and a long etcetera.
👋 Hi, my name is Max Zsol.
I'm a computer engineer and writer of sci-fi, some times with the help of AI.
I also blog about writing, mindfulness, engineering leadership, mechanical keyboards, and a long etcetera.
Are you guilty of avoiding underlining and annotating your books because you’re afraid of damaging their resale value or simply out of respect for the physical object? Well, it’s time to embrace your inner reader and start marking up those pages!
Reading a book is a deeply personal experience, and for many of us, the act of physically interacting with the text is an important part of the process. Whether it’s underlining passages, writing notes in the margins, or simply dog-earing the pages, our physical interactions with a book can help us remember and retain the information we’re reading.
Interacting with a text physically by underlining passages and writing notes in the margins can actually be a way of honoring the spirit of the book. It shows that you are actively participating in the conversation the author is trying to have with you and expressing your own thoughts and ideas. Plus, creating a lasting record of your own thoughts and experiences through annotations can be just as valuable as the book itself.
When we engage with a text in this way, we actively participating in the conversation the author is trying to have with us. We are expressing our own thoughts and ideas, and in doing so, we are contributing to the ongoing dialogue that surrounds a book.
So go ahead and mark up those pages. Protecting books is important, but there’s no reason to be afraid of physically engaging with them. Happy reading!
(Part 3 of Step-By-Step Guide To Configuring Your Planck Using QMK, VIA and Vial on macOS)
You need to setup VIA for macOS as described in the previous posts in order to get Vial up and running.
This guide is organized in four parts:
(The official full detailed instructions can be found in the Vial user guide: Porting a VIA keyboard to Vial)
Start by forking your own copy of Vial repository https://github.com/vial-kb/vial-qmk via github’s interface.
Clone your fork of the Vial repo. You will need the HTTPS url (eg: https://github.com/<github_username>/vial-qmk.git).
git clone --recurse-submodules https://github.com/<github_username>/vial-qmk.gitvial keymapCopy the existing keymaps/viafolder from <folder>/vial-qmk/keyboards/planck/keymaps/via to <folder>/vial-qmk/keyboards/planck/keymaps/vial.
In your <folder>/vial-qmk/keyboards/planck/keymaps/vial/rules.mk, after the line VIA_ENABLE = yes add the following:
VIAL_ENABLE = yesvia: https://get.vial.today/docs/porting-to-via.html#3-create-a-kle-for-via
Plank)Tools / Remove Legends / Allproperty / Top LegendRaw data / Download JSON.For the planck this is what that looks like:
["0,0","0,1","0,2","0,3","0,4","0,5","0,6","0,7","0,8","0,9","0,10","0,11"],
["1,0","1,1","1,2","1,3","1,4","1,5","1,6","1,7","1,8","1,9","1,10","1,11"],
["2,0","2,1","2,2","2,3","2,4","2,5","2,6","2,7","2,8","2,9","2,10","2,11"],
["3,0","3,1","3,2","3,3","3,4","3,5","3,6","3,7","3,8","3,9","3,10","3,11"]Fill out the following JSON template:
{
    "name": "",
    "vendorId": "",
    "productId": "",
    "lighting": "none",
    "matrix": {
        "rows": 0,
        "cols": 0
    },
    "layouts": {
        "labels":
        "keymap":
    }
}
See details at Vial site Create a JSON for VIA
name: Name of your choosing > “OLKB PLANCK REV6.1”,vendorId: Hexadecimal from <folder>/vial-qmk/keyboards/planck/config.hproductId: Hexadecimal from <folder>/vial-qmk/keyboards/planck/via/config.hmatrix: dimensions of your matrixlabels: See details in the Via documentation. Delete if you don’t have alt layoutskeymap: the contents from KLE’s JSONIn the case of a Planck this would seem to be the layout of the keys
[
 ["0,0","0,1","0,2","0,3","0,4","0,5","0,6","0,7","0,8","0,9","0,10","0,11"],
 ["1,0","1,1","1,2","1,3","1,4","1,5","1,6","1,7","1,8","1,9","1,10","1,11"],
 ["2,0","2,1","2,2","2,3","2,4","2,5","2,6","2,7","2,8","2,9","2,10","2,11"],
 ["3,0","3,1","3,2","3,3","3,4","3,5","3,6","3,7","3,8","3,9","3,10","3,11"]
]
However the true layout of the keys is closer to this:
[
   [ "0,0", "0,1", "0,2", "0,3", "0,4", "0,5",
     "4,0", "4,1", "4,2", "4,3", "4,4", "4,5" ],
   [ "1,0", "1,1", "1,2", "1,3", "1,4", "1,5",
     "5,0", "5,1", "5,2", "5,3", "5,4", "5,5" ],
   [ "2,0", "2,1", "2,2", "2,3", "2,4", "2,5",
     "6,0", "6,1", "6,2", "6,3", "6,4", "6,5" ],
   [ "3,0", "3,1", "3,2",
     "7,3", "7,4", "7,5", "7,0", "7,1", "7,2",
     "3,3", "3,4", "3,5" ]
]
Here is the final vial.json file including two alternative layouts for the bottom row:
{
 "name": "Planck",
 "vendorId": "0x03A8",
 "productId": "0xA4F9",
 "lighting": "none",
 "matrix": {
  "rows": 8,
  "cols": 6
 },
 "layouts": {
  "labels": [
   ["Bottom Row", "1x2uC", "4x12", "2x2u"]
  ],
  "keymap": [
   [
    { "c": "#aaaaaa" },
    "0,0",
    { "c": "#cccccc" },
    "0,1", "0,2", "0,3", "0,4", "0,5",
    "4,0", "4,1", "4,2", "4,3", "4,4",
    { "c": "#aaaaaa" },
    "4,5"
   ],
   [
    "1,0",
    { "c": "#cccccc" },
    "1,1", "1,2", "1,3", "1,4", "1,5",
    "5,0", "5,1", "5,2", "5,3", "5,4",
    { "c": "#aaaaaa" },
    "5,5"
   ],
   [
    "2,0",
    { "c": "#cccccc" },
    "2,1", "2,2", "2,3", "2,4", "2,5",
    "6,0", "6,1", "6,2", "6,3", "6,4",
    { "c": "#aaaaaa" },
    "6,5"
   ],
   [
    "3,0", "3,1", "3,2",
    "7,3",
    { "c": "#777777" },
    "7,4\n\n\n0,0",
    { "c": "#cccccc", "w": 2 },
    "7,0\n\n\n0,0",
    { "c": "#777777" },
    "7,1\n\n\n0,0",
    {"c": "#aaaaaa" },
    "7,2",
    "3,3", "3,4", "3,5"
   ],
   [
    {"y": 0.25, "x": 4, "c": "#777777" },
    "7,4\n\n\n0,1",
    {"c": "#cccccc" },
    "7,5\n\n\n0,1",
    "7,0\n\n\n0,1",
    { "c": "#777777" },
    "7,1\n\n\n0,1"
   ],
   {
    "x": 4, "c": "#cccccc", "w": 2 },
    "7,5\n\n\n0,2",
    { "w": 2 },
    "7,1\n\n\n0,2"
   ]
  ]
 }
}vial.json filePlace the generated VIA JSON under <folder>/vial-qmk/keyboards/planck/keymaps/vial/vial.json so that Vial build process can find it.
This file is the KLE compatible layout configuration that is stored directly in the keyboard.
config.h fileStart by generating a unique keyboard ID as follows. From the root of <folder>/vial-qmk/, run the following command to generate a unique Vial keyboard ID:
python3 util/vial_generate_keyboard_uid.pyCopy the generated output. Eg:
#define VIAL_KEYBOARD_UID {0xXX, 0xXX, 0xXX, 0xXX, 0xXX, 0xXX, 0xXX, 0xXX}Next create a new file config.h inside <folder>/vial-qmk/keyboards/planck/keymaps/vial/. Add the following contents to it (the last line must match the output generated above)
/* SPDX-License-Identifier: GPL-2.0-or-later */

#pragma once

#define VIAL_KEYBOARD_UID {0xXX, 0xXX, 0xXX, 0xXX, 0xXX, 0xXX, 0xXX, 0xXX}In order to protect your keyboard from an attach coming from a machine it is connected to, Vial requires the user to unlocks the keyboard the first time it is connected to a computer.
This security feature can be disabled, but it is easy enough to setup and use so we will leave it in.
Pick a combo of at least 2 keys, and take note of the key location on your keyboard.
In my case I’ll choose Esc (located at [0, 1]) and Return (located at [2, 11]) on my planck.
Add the following lines to your config.h file right below the VIAL_KEYBOARD_UID line:
#define VIAL_UNLOCK_COMBO_ROWS { 0, 1 }
#define VIAL_UNLOCK_COMBO_COLS { 2, 11 }If you have followed the previous setup for QMK and VIA this should be straighforward.
You can compile Vial by doing:
qmk compile -kb planck/rev6 -km vialor
make planck/rev6:vialYou might see output like this:
Creating binary load file for flashing: .build/planck_rev6_vial.bin                                 [OK]
Creating load file for flashing: .build/planck_rev6_vial.hex                                        [OK]

Size after:
   text    data     bss     dec     hex filename
      0   49396       0   49396    c0f4 .build/planck_rev6_vial.hex

Copying planck_rev6_vial.bin to qmk_firmware folder                                                 [OK]
(Firmware size check does not yet support cortex-m4 microprocessors; skipping.)
Here is the generated file:
planck_rev6_vial.binFollow the same process as if flashing any other QMK firmware. You can see full details in the previous guide: Step-By-Step Guide To Setting up QMK for the Planck on macOS.
With our planck keyboard we press key combo raise+lower+q (or press the reset button). With the QMK Toolbox open we can see status logs.
*** STM32 DFU device connected: STMicroelectronics STM32 BOOTLOADER (0483:DF11:2200)Open the VIA firmware file in QMK Toolbox. It can be found on the root /qmk_firmware/ folder. In my case:
planck_rev6_vial.binClick the Flash button in QMK Toolbox.
Here is my output in all it’s glory:
*** Attempting to flash, please don't remove device
[...]
 Erase done.
[...]
 Download done.
 File downloaded successfully
 Transitioning to dfuMANIFEST state
*** STM32 DFU device disconnected: STMicroelectronics STM32 BOOTLOADER (0483:DF11:2200)That’s it for setting up VIAL. Now we are ready to use the visual GUI to edit the keymap.
Download the GUI from their site: Download Vial. For mac the file is Vial-v0.4.1.dmg
As with VIA macOs will likely throw you a security alert. Go to your security settings to open the app. (Always make sure you trust and understand what you download from the internet.)
The connected keyboard should load. If it doesn’t click the Refresh button.
From here on out the workflow is the same as with VIA. Any changes you do in the UI app will reflect right away in your keyboard. No compilation. No flashing.
Keep in mind that you can’t use VIA and Vial at the same time.
Enjoy and have fun! 🥂
(Part 2 of Step-By-Step Guide To Configuring Your Planck Using QMK, VIA and Vial on macOS)
These instructions assume you have followed Step-By-Step Guide To Setting up QMK for the Planck on macOS.
You can read the detailed instructions from the VIA site
If you don’t intend on editing the source or using this setup to install Vial, and your keyboard is supported, you can simply download the VIA firmware for your keyboard from their site: Firmware Downloads.
This guide is organized in four parts:
We need to crate a new via folder exclusively to use with VIA in the location keyboards/<keyboardname>/keymaps/via.
In our case and for a Planck keyboard if previously we were using:
<folder>/qmk_firmware/keyboards/planck/keymaps/<github_username>Now we will use:
<folder>/qmk_firmware/keyboards/planck/keymaps/viaIn the case of the Planck keyboard the QMK repo already has this folder and its contents are:
keymap.c
readme.md
rules.mk
Here are the preset contents of the rules.mk file:
VIA_ENABLE = yes
LTO_ENABLE = yes

# Not enough USB endpoints
CONSOLE_ENABLE = no
The contents of the keymap.c file are similar to those in the previous default keyboard folder but the number of layers and content is much more simplified.
If QMK’s repo doesn’t already have a via folder for your keyboard follow the next two steps to create the files within, otherwise you can skip them.
If your keyboard folder already contains the via keymap directory you might notice that there is no config.h file within. This is because the settings required for VIA should be put in the keyboard directory. In our case <folder>/qmk_firmware/keyboards/planck/config.h.
In this folder create a rules.mk file and add the following line:
VIA_ENABLE = yesPer the official docs: “This will enable dynamic keymaps, raw HID message handling and bootmagic lite.”
You must create a keymap.c in the via keymap directory with a number of preset layers initialized to sensible default keycodes. This areCreate a KLE for VIA the layers to be used for loading the dynamic keymaps.
You can create a blank layout for your keyboard via KLE. Read how to create Layouts in VIA documentation, with Simple and Advanced examples.
If you have followed the previous setup for QMK, your keymap defaults should be set. You can compile VIA by doing:
qmk compile -km viaYou might see output like this:
Creating binary load file for flashing: .build/planck_rev6_drop_via.bin                             [OK]
Creating load file for flashing: .build/planck_rev6_drop_via.hex                                    [OK]

Size after:
   text    data     bss     dec     hex filename
      0   41292       0   41292    a14c .build/planck_rev6_drop_via.hex

Copying planck_rev6_drop_via.bin to qmk_firmware folder                                             [OK]
(Firmware size check does not yet support cortex-m4 microprocessors; skipping.)
Here is the generated file:
planck_rev6_drop_via.binFollow the same process as if flashing any other QMK firmware. You can see full details at [[⤒ Post 3 - Setting up QMK in macOS]].
With our Planck keyboard we press key combo raise+lower+q (or press the reset button). With the QMK Toolbox open we can see status logs.
*** STM32 DFU device connected: STMicroelectronics STM32 BOOTLOADER (0483:DF11:2200)Open the VIA firmware file in QMK Toolbox. It can be found on the root /qmk_firmware/ folder. In my case:
planck_rev6_drop_via.binClick the “Flash” button in QMK Toolbox.
Here is my output in all it’s glory:
*** Attempting to flash, please don't remove device
[...]
 Erase done.
[...]
 Download done.
 File downloaded successfully
 Transitioning to dfuMANIFEST state
*** STM32 DFU device disconnected: STMicroelectronics STM32 BOOTLOADER (0483:DF11:2200)
Alternatively you can also flash your keyboard from the terminal like this:
qmk flashThat’s it for setting up VIA. Now we are ready to use the visual GUI to edit the keymap. Have fun.
Download the GUI from their repo: the-via/releases. For mac the file is via-1.3.1-mac.dmg
As of September 2021, the latest release 1.3.1 is over a year old (Jun 18, 2020). This is another reason folks are moving to Vial.
In macOs you will run into a security alert. You will have to go to your security settings to open the app. (Always make sure you trust and understand what you download from the internet.)
VIA already recognized the keyboard I have connected and shows the configuration on screen.
Any changes you do in the VIA app will reflect right away in your keyboard. No compilation and no flashing. Really, really convenient for testing and optimizing your layouts.
Have fun! 🎉
(Part 1 of Step-By-Step Guide To Configuring Your Planck Using QMK, VIA and Vial on macOS)
To configure QMK there is no getting away from some CLI action, so let’s get started with the main firmware first, and then let’s explore Via and Vial (Part 2 and 3). Looks like there are no clean shortcuts.
Let’s start with the official Complete Newbs Guide.
We are basically going to build a new (custom/homebrew) keyboard firmware from the source code. Our Planck came with qmk firmware preinstalled, and now we are going to build our own so we can customize it to our liking.
I am going to assume that you have some programming experience but if you don’t I think you will still be able to follow along nicely.
Official documentation at: Setup Your Environment.
If you don’t already have a favorite text editor you will have to install one. Sublime, Atom, VS code are all great (and free!) choices.
You will need to install Homebrew. What does homebrew do? It “installs the stuff you need that Apple (or your Linux system) didn’t.”
Installation is super easy:
/bin/bash -c "$(curl -fsSL https://raw.githubusercontent.com/Homebrew/install/HEAD/install.sh)"Install the qmk toolbox. The toolbox is a “graphical program for Windows and macOS that allows you to both program and debug your custom keyboard.”
My guess is that the toolbox is going to make our lives easier, so I am going to opt to install it even though it is optional according to the docs.
Let’s see if the installation is simple.
Option A: Installing the binary
For those not comfortable with coding of if homebrew is just not your thing you can always Download and install the binary directly.
Option B: Installing via homebrew
For those familiar with homebrew, Homebrew-Cask is an extension that allows the installation of GUI applications (such as Google Chrome or Atom).
brew tap homebrew/cask-drivers
brew install --cask qmk-toolbox
And the command to upgrade, if you ever need it:
brew cask upgrade qmk-toolboxPer the docs:
The QMK CLI makes building and working with QMK keyboards easier. We have provided a number of commands to simplify and streamline tasks such as obtaining and compiling the QMK firmware, creating keymaps, and more.
Install the QMK CLI by running:
brew install qmk/qmk/qmkGit comes installed by default on most Mac and Linux machines.
Follow the instructions How to Use GitHub with QMK to get your fork of the repo at qmk/qmk_firmware under your own github account. This will prepare your local qmk repo with the remote origin already pointing to your own github url.
You don’t have to clone the repo locally (the next QMK setup will do it for you), but if you want to you can go ahead:
git clone --recurse-submodules https://github.com/<github_username>/qmk_firmware.gitOnce you have installed QMK you will have to set it up.
qmk setupOr better yet if you followed the git setup
qmk setup <github_username>/qmk_firmwareIf you care where the firmware folder will be installed (or are just as obsessive-compulsive as I am) then use:
qmk setup <github_username>/qmk_firmware -H <folder>You will get some prompts. In most cases, you want to accept the default options.
☒ Could not find qmk_firmware!
Would you like to clone <github_username>/qmk_firmware to '<folder>/qmk_firmware'? [y/n] y
Cloning into '<folder>/qmk_firmware'...

[...]

Ψ Successfully cloned https://github.com/<github_username>/qmk_firmware to <folder>/qmk_firmware!
Ψ Added https://github.com/qmk/qmk_firmware as remote upstream.
Would you like to set '<folder>/qmk_firmware' as your QMK home? [y/n]

[...]

☒ Can't find arm-none-eabi-gcc in your path.
☒ Can't find avr-gcc in your path.
Would you like to install dependencies? [Y/n] y

[...]

Ψ QMK is ready to go
Success!
If at a later time you want to move the installation folder you can do it following the instructions by using the cli configuration to edit the variable user.qmk_home.
To read the configuration value you can do:
qmk config user.qmk_homeAnd to set it to a new value:
qmk config user.qmk_home=<new folder>To validate the installation and setup let’s generate qmk firmware with a default keymap.
qmk compile -kb <keyboard> -km defaultYou can find a list of valid keyboards on github Included Keyboards.
For instance for our Planck keyboard we would use:
qmk compile -kb planck/rev6_drop -km defaultAt the end of the compilation (which should take less than a minute), you’ll get something like this:
Creating binary load file for flashing: .build/planck_rev6_drop_default.bin                         [OK]
Creating load file for flashing: .build/planck_rev6_drop_default.hex                                [OK]

Size after:
   text    data     bss     dec     hex filename
      0   51240       0   51240    c828 .build/planck_rev6_drop_default.hex

Copying planck_rev6_drop_default.bin to qmk_firmware folder                                         [OK]
(Firmware size check does not yet support cortex-m4 microprocessors; skipping.)
The .build folder inside qmk_firmware should show the following new files:
planck_rev6_drop_default.bin
planck_rev6_drop_default.elf
planck_rev6_drop_default.hex
planck_rev6_drop_default.mapOk, I haven’t lost you yet? We are almost there…
To make future development easier, set your default keyboard to whatever you have from the list of included keyboards.
qmk config user.keyboard=planck/rev6_dropGive your default keymap name. QMK recommends most people use their GitHub username:
qmk config user.keymap=<github_username>Your configurations are saved to /Users/<username>/Library/Application Support/qmk/qmk.ini
Now that the defaults are set you can compile your keyboard simply like this.
qmk compileDon’t run this command yet, though since you need to create your first keymap first to get it to run.
That’s it! We are done setting things up!
Official documentation at: Building Your First Firmware.
To create a new keymap run the following command. A copy of the default QMK keymap will be generated for you with the name used for config user.keymap that you should have configured in Part 1.
qmk new-keymapHere is the output:
Ψ <username> keymap directory created in: <folder>/qmk_firmware/keyboards/planck/keymaps/<github_username>
Ψ Compile a firmware with your new keymap by typing:

 qmk compile -kb planck/rev6_drop -km <github_username>
Make a note of the new folder where the keymap is stored. In the case above that is <folder>/qmk_firmware/keyboards/planck/keymaps/<github_username>. This is the place where you will go edit your new keymap.
As we mentioned before in my case this is located at <folder>/qmk_firmware/keyboards/planck/keymaps/<github_username>. If you didn’t save this location in the previous step look for the keymap in the keyboard family you used and search for your username.
Here are the contents of this folder:
config.h
keymap.c
readme.md
rules.mk
The file keymap.c contains the layout and behavior of your keyboard.
Around lines 40-50 the layouts section starts. It would display ASCII representation of the layers like this:
/* Qwerty
* ,-----------------------------------------------------------------------------------.
* | Tab | Q | W | E | R | T | Y | U | I | O | P | Bksp |
* |------+------+------+------+------+------+------+------+------+------+------+------|
* | Esc | A | S | D | F | G | H | J | K | L | ; | " |
* |------+------+------+------+------+------+------+------+------+------+------+------|
* | Shift| Z | X | C | V | B | N | M | , | . | / |Enter |
* |------+------+------+------+------+------+------+------+------+------+------+------|
* | Brite| Ctrl | Alt | GUI |Lower | Space |Raise | Left | Down | Up |Right |
* `-----------------------------------------------------------------------------------'
*/
Here is where you will be doing your edits to add or remove layers, keys, behaviors, etc.
You can read further about how to Customize The Layout To Your Liking
If you have your keymap defaults setup you can now compile simply by doing:
qmk compileYou might see output like this:
Creating binary load file for flashing: .build/planck_rev6_drop_<github_username>.bin                          [OK]
Creating load file for flashing: .build/planck_rev6_drop_<github_username>.hex                                 [OK]

Size after:
   text    data     bss     dec     hex filename
      0   51240       0   51240    c828 .build/planck_rev6_drop_<github_username>.hex

Copying planck_rev6_drop_<github_username>.bin to qmk_firmware folder                                          [OK]
(Firmware size check does not yet support cortex-m4 microprocessors; skipping.)
Here are the generated files:
planck_rev6_drop_<github_username>.bin
planck_rev6_drop_<github_username>.elf
planck_rev6_drop_<github_username>.hex
planck_rev6_drop_<github_username>.mapOfficial documentation at: Flashing Firmware
In the case of a Planck keyboard, this is accomplished by the key combo raise+lower+q, or pressing the reset button on the bottom of the board. The Planck should play the reset sound and the LEDs should turn off.
YMMV with your keyboard. Check QMK’s instructions to Put Your Keyboard into DFU (Bootloader) Mode if you are having trouble.
Open QMK Toolbox
If you have QMK Toolbox open you should see something along these lines:
*** DFU device connected: Atmel Corp. ATmega32U4 (03EB:2FF4:0000)
*** HID console connected: OLKB Planck (FEED:6060:0006)
*** HID console disconnected: OLKB Planck (FEED:6060:0006)
*** STM32 DFU device connected: STMicroelectronics STM32 BOOTLOADER (0483:DF11:2200)Open the firmware file in QMK Toolbox. It can be found in the root /qmk_firmware/ folder:
The firmware file follows this naming format:
<keyboard_name>_<keymap_name>.{bin,hex}in my case:
planck_rev6_drop_<github_username>.binClick the Flash button in QMK Toolbox.
Here is my output in all its glory:
*** Attempting to flash, please don't remove device
>>> dfu-util -a 0 -d 0483:DF11 -s 0x8000000:leave -D <folder>/qmk_firmware/planck_rev6_drop_username.bin
 dfu-util 0.10
 Copyright 2005-2009 Weston Schmidt, Harald Welte and OpenMoko Inc.
 Copyright 2010-2020 Tormod Volden and Stefan Schmidt
 This program is Free Software and has ABSOLUTELY NO WARRANTY
 Please report bugs to http://sourceforge.net/p/dfu-util/tickets/
 Opening DFU capable USB device...
 ID 0483:df11
 Run-time device DFU version 011a
 Claiming USB DFU Interface...
 Setting Alternate Setting #0 ...
 Determining device status: state = dfuERROR, status = 10
 dfuERROR, clearing status
 Determining device status: state = dfuIDLE, status = 0
 dfuIDLE, continuing
 DFU mode device DFU version 011a
 Device returned transfer size 2048
 DfuSe interface name: "Internal Flash "
 Downloading element to address = 0x08000000, size = 51244

Erase [ ] 0% 0 bytes
Erase [ ] 3% 2048 bytes
Erase [= ] 7% 4096 bytes
Erase [== ] 11% 6144 bytes
Erase [=== ] 15% 8192 bytes
Erase [==== ] 19% 10240 bytes
Erase [===== ] 23% 12288 bytes
Erase [====== ] 27% 14336 bytes
Erase [======= ] 31% 16384 bytes
Erase [======== ] 35% 18432 bytes
Erase [========= ] 39% 20480 bytes
Erase [========== ] 43% 22528 bytes
Erase [=========== ] 47% 24576 bytes
Erase [============ ] 51% 26624 bytes
Erase [============= ] 55% 28672 bytes
Erase [============== ] 59% 30720 bytes
Erase [=============== ] 63% 32768 bytes
Erase [================ ] 67% 34816 bytes
Erase [================= ] 71% 36864 bytes
Erase [================== ] 75% 38912 bytes
Erase [=================== ] 79% 40960 bytes
Erase [==================== ] 83% 43008 bytes
Erase [===================== ] 87% 45056 bytes
Erase [====================== ] 91% 47104 bytes
Erase [======================= ] 95% 49152 bytes
Erase [======================== ] 99% 51200 bytes
Erase [=========================] 100% 51244 bytes
 Erase done.

Download [ ] 0% 0 bytes
Download [= ] 7% 4096 bytes
Download [== ] 11% 6144 bytes
Download [=== ] 15% 8192 bytes
Download [==== ] 19% 10240 bytes
Download [===== ] 23% 12288 bytes
Download [====== ] 27% 14336 bytes
Download [======= ] 31% 16384 bytes
Download [======== ] 35% 18432 bytes
Download [========= ] 39% 20480 bytes
Download [========== ] 43% 22528 bytes
Download [=========== ] 47% 24576 bytes
Download [============ ] 51% 26624 bytes
Download [============= ] 55% 28672 bytes
Download [============== ] 59% 30720 bytes
Download [=============== ] 63% 32768 bytes
Download [================ ] 67% 34816 bytes
Download [================= ] 71% 36864 bytes
Download [================== ] 75% 38912 bytes
Download [=================== ] 79% 40960 bytes
Download [==================== ] 83% 43008 bytes
Download [===================== ] 87% 45056 bytes
Download [====================== ] 91% 47104 bytes
Download [======================= ] 95% 49152 bytes
Download [======================== ] 99% 51200 bytes
Download [=========================] 100% 51244 bytes
 Download done.
 File downloaded successfully
 Transitioning to dfuMANIFEST state
*** STM32 DFU device disconnected: STMicroelectronics STM32 BOOTLOADER (0483:DF11:2200)
*** HID console connected: Drop Planck (03A8:A4F9:0006)You can also flash your keyboard from the terminal like this:
qmk flashYou are done! You are set up to edit your keymap and flash your changes to your keyboard.
Enjoy! 🍾
Some time back I built my very first mechanical keyboard. If you are curious, it was a Planck, a 40% ortholineal keyboard.
One fof the first things to do with a new custom keyboard is installing and compiling QMK the firmware that runs the keyboard. The Planck comes installed with OLKB’s QMK for Planck and compiling locally allows for user customizations which I have a bunch (what’s the point of a programmable keyboard otherwise?).

Why do we need to compile the firmware? Well, I assume the keyboard takes a program in machine code only (don’t know anything about firmware!), so QMK allows users to build the final version of the code to run on their keyboards.
And why do we need to change the firmware of the keyboard you ask? Well to update the keymap (aka the binding of physical keys on a keyboard to commands).
But compiling QMK from the source won’t always be needed. Once we have done the initial setup there are visual tools that might make our life’s easier.
See A Detailed Overview of QMK, VIA, and Vial Visual Configurators for Mechanical Keyboards for more details.
This is a three part series:
Here are some links that helped while trying to make sense of all this.
Proactivity can be a great asset for any team, but it can also be a double-edged sword. One instance I recall is when my boss brought up an issue another team was struggling with. I remembered encountering a similar problem and offered a solution we had previously used to unblock them. However, rather than thanking me for my proactive approach, my boss made it my responsibility to fix the problem.
It’s important to encourage proactive behavior in your team, but it’s also crucial to recognize and reward it when it occurs. If proactiveness is punished or not acknowledged, employees may become discouraged and less likely to offer solutions in the future.
I learned my lesson and never offered to solve problems for my boss again. To foster a proactive culture, it’s important to encourage and reward proactiveness rather than punishing it. Make sure your team knows that feedback is always welcome, even if it may not always be acted upon.

Here is a collection of the most popular libraries for building UIs with draggable components in React or vanilla Js.
Beautiful and accessible drag and drop for lists with React
React-beautiful-dnd is the most popular drag-and-drop library, known for its high performance and powerful API. Build by Atlassian, it appears to have paused active development.
Draggable is a modern drag and drop JavaScript library. Lightweight, modular and accessible
Draggable is a powerful library. It was originally created by Shopify, but it’s now no longer maintained.
React DnD is a set of React utilities to help you build complex drag and drop interfaces while keeping your components decoupled. It is a perfect fit for apps like Trello and Storify, where dragging transfers data between different parts of the application, and the components change their appearance and the application state in response to the drag and drop events
JavaScript drag and drop, resizing, and multi-touch gestures for modern browsers (and also IE9+)
Interact.js supports inertia and snapping, as well as multi-touch and simultaneous interactions.
A simple component for making elements draggable
React-Draggable is, as the name suggests, a library for building draggable components in React. Seems like a very solid and simple solution for adding this capability to a React project.
Part of React-Grid-Layout. A great choice if the goal is to build a grid layout UI with drag and drop in React.
Make that shiz draggable
Rad because it supports mouse and touch devices
Draggabilly is a vanilla JS library for implementing drag-n-drop capabilities.
A resizable and draggable component for React
React-rnd is a simple and lightweight implementation of DnD in React.

It’s natural for humans to feel skeptical or resistant to the idea of robots replacing them.
As robots have become more advanced and capable of performing various tasks, the discussions surrounding artificial intelligence (AI) have narrowed to focus on more complex topics such as consciousness and art.
There are those who believe that robots will never be able to produce true art. The arguments for this position are often abstract and difficult to understand. Recent advances in AI art have sparked a heated debate about the ethics of AI art and whether it can truly be considered art.
One concern is the potential for AI art to disrespect the rights of traditional artists. Additionally, the ethics of using datasets for training AI art have come into question, particularly with the recent controversy surrounding the use of unlicensed software in the GitHub copilot project.
Recent advancements in AI art have sparked a heated debate. Perhaps the most pressing question is whether or not AI art is a legitimate form of art that respects the rights of traditional artists. The ethics of using datasets for training AI art have come into question.
At the core of the debate is the question, does AI art deserve to be called “art” at all?
As we continue to see progress in this field, it’s important that we not only prepare for the future but also engage in thoughtful discussions about the potential consequences of AI art.
It’s clear that AI is progressing rapidly, and as a society, we need to be prepared for these changes rather than simply resisting them.
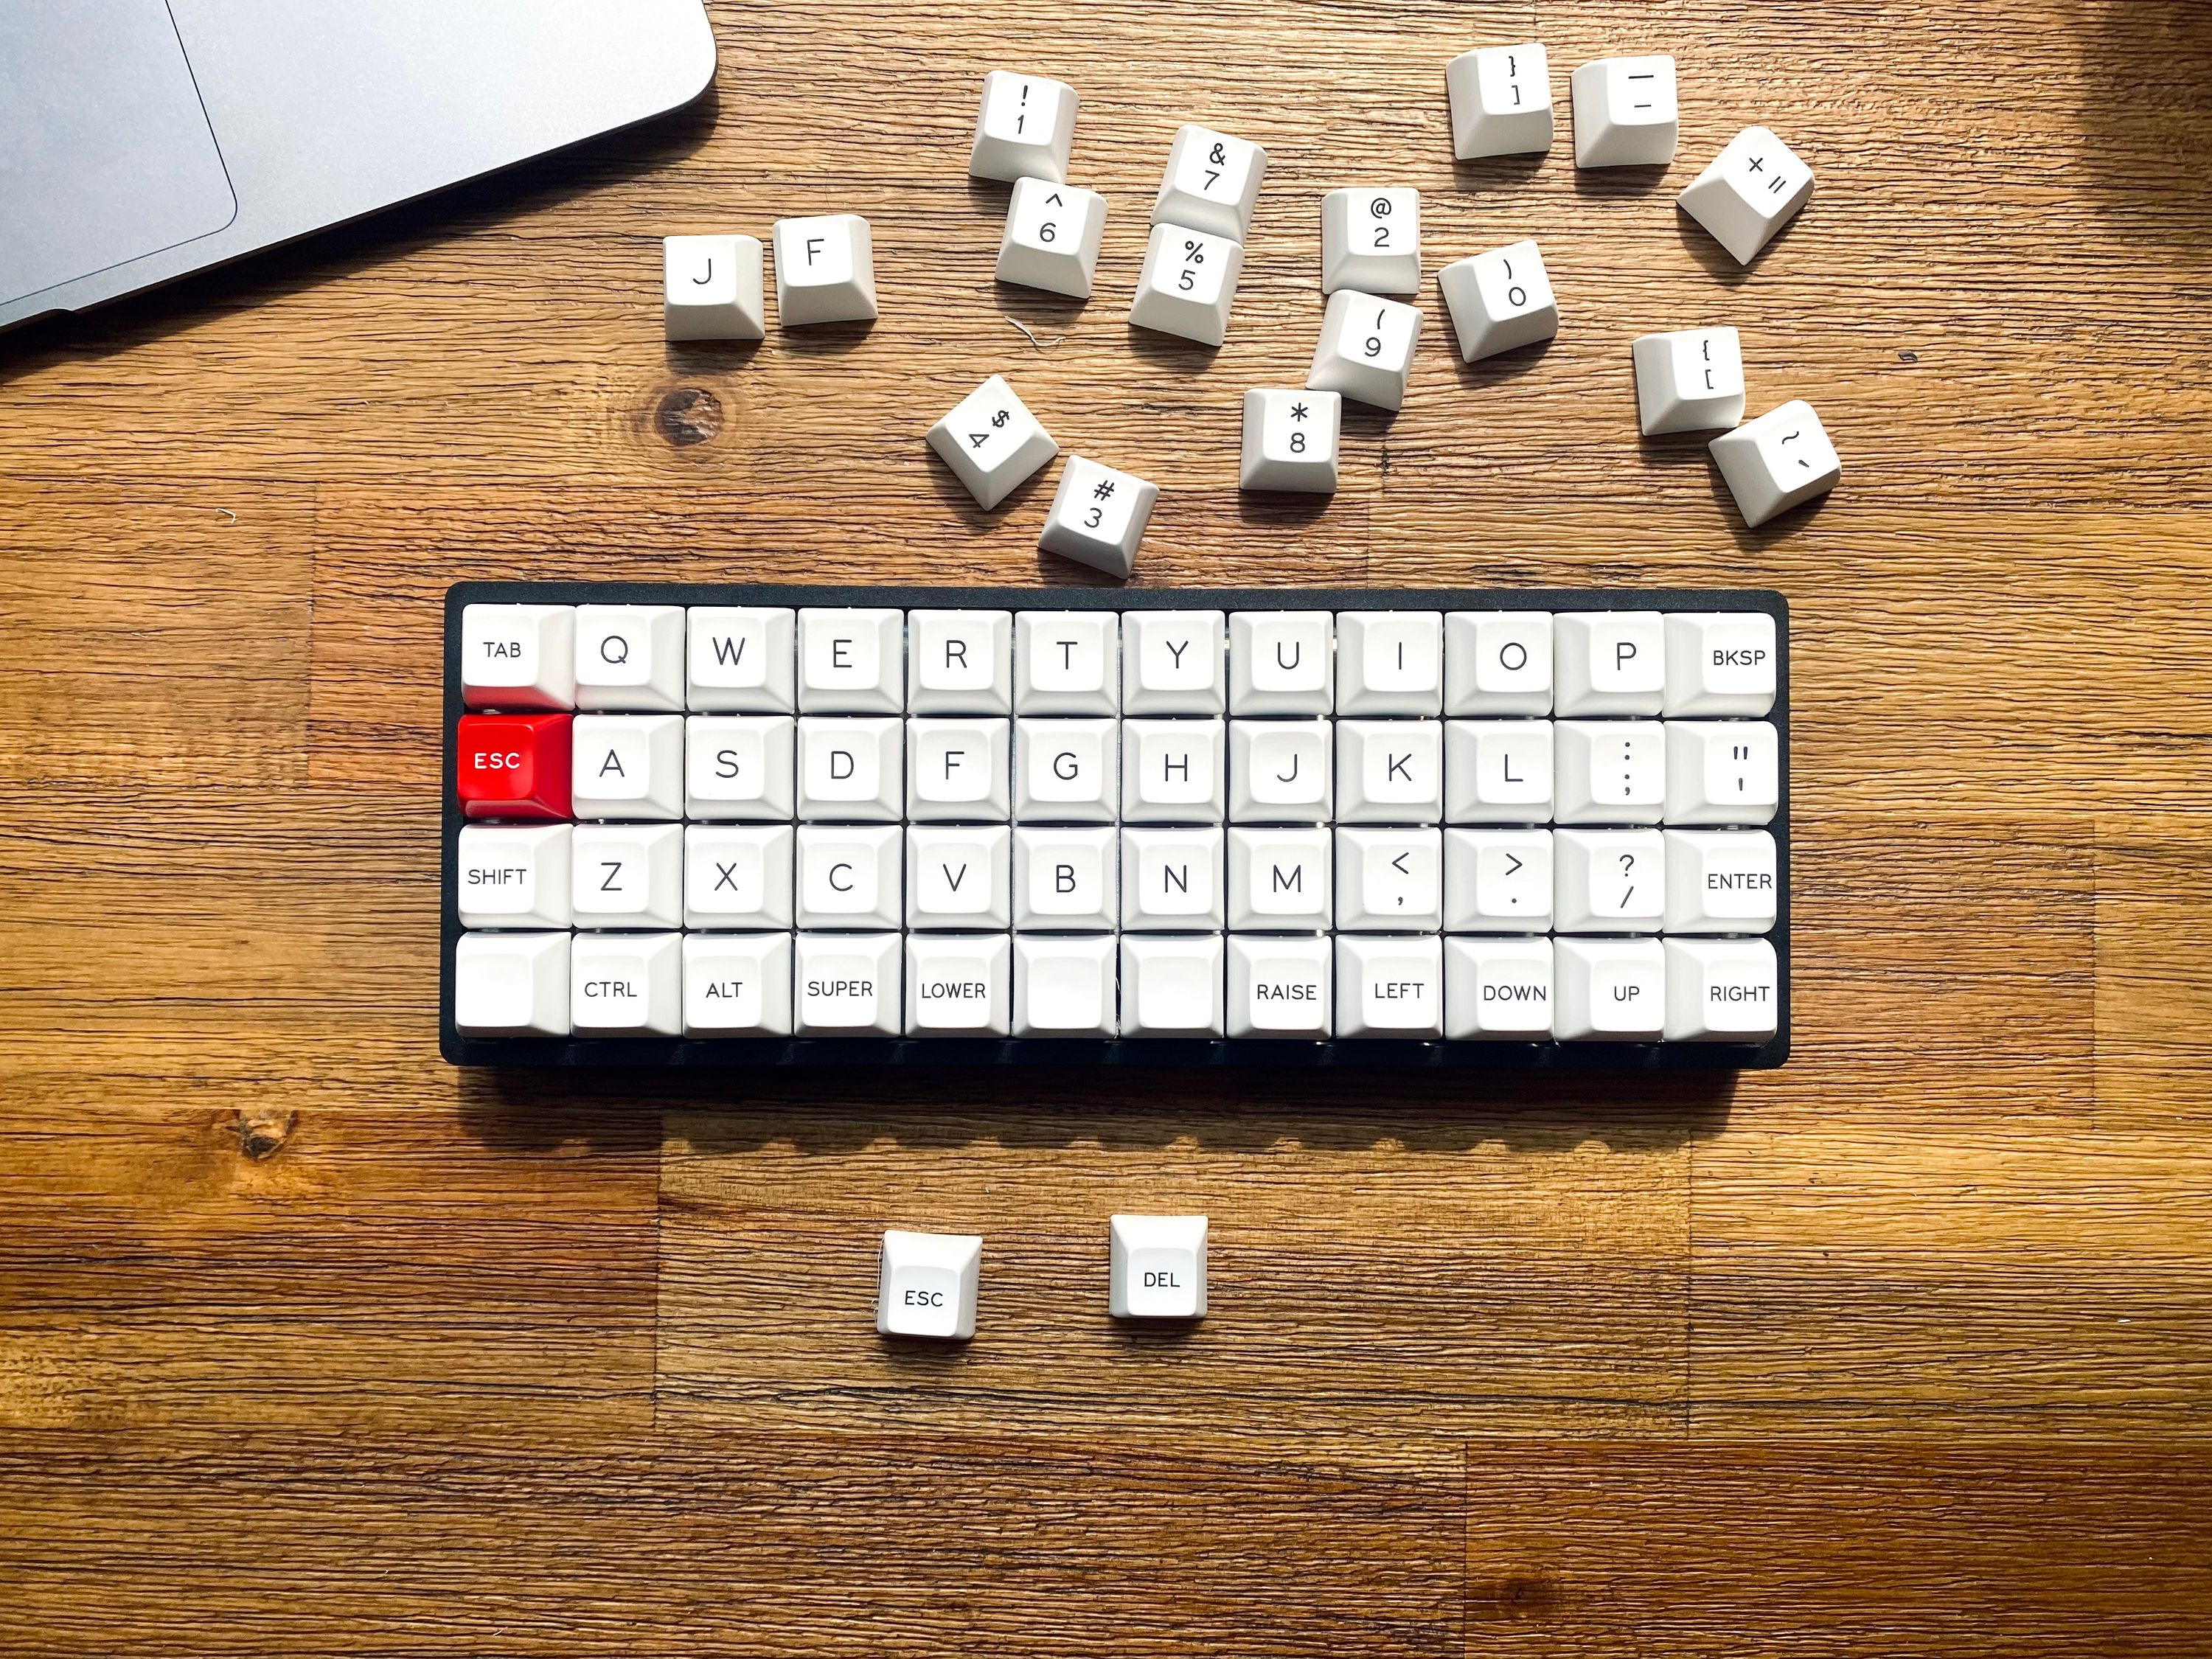
An overview of the visual tools available for mapping key configurations on custom made mechanical keyboards.
QMK is one of the most common default firmware that come preinstalled with custom keyboards like the 40% ortholinear Planck.
The high-level workflow for updating the QMK firmware is:
.hex/.bin file to the keyboard with the QMK ToolboxSince setting up the QMK build environment is non-trivial, the QMK Configurator can make the process of generating the firmware easier.
The QMK Configurator doesn’t support all the QMK features (eg. Tap Dance). Per the documentatio: “Features that require adding functions to the keymap.c file, such as Tap Dance or Unicode, can not be compiled in Configurator at all”.
planck/rev6LAYOUT_ortho_4x12my_first_keymapLoad layout.json file so you can reimport it on the QMK configurator at a later time and do more edits. (This is not the file you flash on the keyboard)The nice thing about VIA is that it doesn’t require to repeatedly flash your keyboard to update the layout. This means changing the keymap of the keyboard can be done without needing to reflash firmware.
And via comes with a nice VIA Configurator to visually program the keyboard and load the configuration on-the-fly.
VIA looks awesome but according to QMK’s collaborator Keebio, VIA comes with certain limitations: “Do note that not all features of QMK are supported by the VIA Configurator, so if you want to use more advanced features of QMK like Tap Dance, then you’ll need to set up a QMK build environment. By default on most VIA-supported keyboards, there is a limit of 4 layers. The ability to change rotary encoder keycodes is also not currently present in VIA.”
Another downside of VIA is that it is not opensource. For that last reason, some people look into other options (like Vial).
On the other hand, VIA has a keyboard testing tool with visual and sound indicators. Helps make sure your keyboard and all switches are working as expected.
Vial is another visual configurator that doesn’t require to flash the keyboard. It is open source, which is great, and allows the configuration to be stored in the keyboard without merging to the repo. Again this is great to speed things up, especially when (getting started with programmable keyboards and) testing new configurations.
Per Vial site “Vial is decentralized: with Vial you do not have to submit your keyboard as a pull-request to any third-party repositories before it can be used in the GUI; instead, the keymap JSON definition is stored within the keyboard firmware and is retrieved at runtime.”
According to their site “Vial is an open-source cross-platform […] GUI and a QMK fork for configuring your keyboard in real time.” Unlike VIA, Vial is open source.
Vial also seems to suffer from the same size limitation as VIA and limits the number of layers to 4 or less.
Vial (and VIA) seems like a good option for quickly testing layouts, but complex setups (eg. adding support for multiple alternative layouts like QWERTY+Dvorak+Coleman) might require going back to QMK directly.
| QMC | VIA | Vial | |
|---|---|---|---|
| Open Source | ✅ | ❌ | ✅ |
| Works without repeated flashing | ❌ | ✅ | ✅ |
| Works without compilation | ❌ | ✅ | ✅ |
| Speed | slow | fast | fast |
| Supports advanced features (eg. Tap Dance) | ❌ | ❌ | ✅ |
| Supports encoders | ✅ | ❌ | ✅ |
| Layers | 30+ | ~4 | ~4 |
I’d advice to use VIA and Vial whenever possible and only use QMC if you need more than 4 layers.
A life of rules is a life of order. Order and creativity are not opposed concepts, they are different dimensions altogether.
Rules create order, and order can be understood as a form of restriction.
Restrictions can help us to think differently and find creative solutions to problems. When we have too many options or too much freedom, it can be overwhelming and lead to decision paralysis. On the other hand, when we have a limited set of options or constraints to work with, it can help focus our attention and stimulate our creativity.
For example, if you are given a blank canvas and told to paint whatever you want, you may feel overwhelmed by the endless possibilities. However, if you are given a specific theme or told to use a limited color palette, it can help narrow your focus and inspire more creative ideas.
In addition, restrictions can help to challenge our assumptions and push us to think outside the box. By forcing us to work within certain boundaries, we may be forced to come up with new and innovative ways of solving problems or achieving our goals.
If we approach living as a creative act, rules in life can (and should) enhance our creativity.
We follow rules to highlight where our attention should go. By introducing rules we limit the space where our attention wanders, which then in turn allows us to give more undivided attention to the areas we care for the most.
If there are activities in which you want to spend energy, create a rule for them and move on. Let the rule replace the need for attention.
When coming up with rules to save mental energy, pick activities that can easily be automated. Those tasks have a low return on investment. The time spent on them could be better used somewhere else.
If choosing what clothes to wear every morning is not something you care for, create a capsule wardrobe and stop wasting mental cycles on that task.1
Rules allow our attention to focus on what we care about. This helps save our mental energy and creativity for solving problems. Limitations help us solves problems creatively by helping focus our attention in a narrow space. Instead of becoming distracted by noise, we are focused.
Overall, restrictions can be a useful tool for stimulating creativity, as long as they are not overly constricting or unrealistic.
Note: This post was written with help from ChatGPT. More details here.
I stopped thinking about what rings to wear once I got married. The choice of jewelry was done once and once alone.↩︎

Here is a collection of the most reliable libraries for building grid layouts with support for draggable components in React, vanilla Js, or directly into the HTML5 canvas in 2D or 3D.
A draggable and resizable grid layout with responsive breakpoints, for React
React-Grid-Layout is a library for draggable and resizable grid layouts, with responsive breakpoints, for React. The most complete and popular of all the solutions.
React-Draggable above is part of this framework.
Konva.js is an HTML5 Canvas JavaScript framework that extends the 2d context by enabling canvas interactivity for desktop and mobile applications
Konva.js is a framework for 2D object manipulation implemented with HTML canvas. Seems incredibly powerful, although the site looks dated, which might be a consequence of it being a one person project.
Additionally React-Konva is a Konva components library for React.
Mobile-friendly modern Typescript library for dashboard layout and creation. Making a drag-and-drop, multi-column responsive dashboard has never been easier. Has multiple bindings and works great with React, Vue, Angular, Knockout.js, Ember and others
Gridstack is a vanilla framework optimized for dashboards.
Packery is a JavaScript library and jQuery plugin that makes gapless and draggable layouts. It uses a bin-packing algorithm to fill in empty gaps. Packery layouts can be intelligently ordered or organically wild. Elements can be stamped in place, fit in a specific spot, or dragged around. It’s perfect for draggable dashboard and seamless Masonry image galleries
Packery a library for creating grid layouts with dragging capabilities.
Appears to be more limited in the layout options than React-Grid-Layout, and doesn’t appear to be in active development.
Gridster is a jQuery plugin that allows building intuitive draggable layouts from elements spanning multiple columns. You can even dynamically add and remove elements from the grid
Gridster is a jQuery plugin for building draggable grid layouts. No longer in development. It was the inspiration for Gridstack.
The libraries below rely on HTML5 canvas for rendering. Full screen canvas could become a performance bottleneck, but it could be the right solution for the right problem.
For very simple projects in React, I will go with React-Draggable, or React-Grid-Layout if I need more complex UIs. If I can’t use React, Konva seems like a great solution for using with Vanilla.js.

All my life I have faced a conflict I can’t seem to resolve. Time after time I find an apparent clash between the ideas of art and science.
Some art (eg. generative, ai) is heavily driven by technology, but the output is not particularly technical.
What attracted me most about “Systemic Art” was the focus on the art-making process over the final artwork. However, there is not a lot of information out there about the movement.
Art critic Lawrence Alloway identifies it as follows:
“[A] field of increasingly popular geometric abstract paintings, artworks containing a simple, methodical, organization exploring repetition and pattern.”
A few more notes:
“To work with a plan that is pre-set is one way of avoiding subjectivity. It also obviates the necessity of designing each work in turn. The plan would design the work. Some plans would require millions of variations, and some a limited number, but both are finite. Other plans imply infinity. In each case however, the artist would select the basic form and rules that would govern the solution of the problem. After that the fewer decisions made in the course of completing the work, the better. This eliminates the arbitrary, the capricious, and the subjective as much as possible. That is the reason for using this method.”
I find the core concepts fascinating:
So as I continue the search across the space between art and science, the prioritization of process above all else, as introduced in “Systemic” or “Process” art, appears to me as the purest of all the forms of creation.
Obviously, heavily inspired by the film Color (not “Colors”) by Tom Sachs.
#F5111E
#F90F1B)#F11220)#FF732C
#FF6620)#FE7F37)#FDBD35
#FDB73C)#FDC22D)#42421F
#303649 - Benjamin Moore Impervex LATEX High Gloss Metal and Wood Enamel Classic Navy 309 35#3075A3 - NYPD Police Barricade Blue#B5E3FC - Gulf Porshe 917 Blue#5CC9C8 - Tiffany Blue#030303
#060606 - Benjamin Moore Impervex LATEX High Gloss Metal and Wood Enamel Black 309 80#000000 - Photocopier Black#F8FBFC

The maxim of the indie hacker is that in order to create something useful for others, one must first make something useful for oneself. Solo entrepreneurs have it right.
Look for a problem in your life (you likely won’t have to look too far), and fix it. If you are successful you would have solved a problem for yourself. And beyond that, if other people have the same problem, you now have built something they can use/enjoy as well.
I think of art making the same way.
I make art for myself. I am not doing it to find my crowd. I am doing it for me first.
This is the ultimate Henry Darger move. HD is the guy who spent years writing and illustrating a novel thousands of pages long, for himself and no one else. Nobody even knew he was writing until after he died.
I want to make art that addresses my aesthetic interests. Art that heals my creative soul.
That is my goal.

Writing helps me focus on creating new ideas. Things never look as clear in my head as when I write them down.
In my head concepts seem more clear than they really are. Like in a dream, I believe I understand things better than I do. I miss connections, I make assumptions, and my arguments have gaps I overlook entirely.
When I force myself to write things down I realize how little I know.
Removing judgment from writing allows the truth to come out. Some truths are too ugly so we keep them deep in our minds. Writing can help expose those.
Silencing the inner critic (as when done for writing for meditation or therapy) is a good practice even when writing for others. It allows for ideas to surface before they can be killed by doubt. Criticizing is easy and young ideas are fragile.
Writing clears my mind and helps put my ideas in order. When I am stuck, nothing helps as much as starting writing.

We suffer more from our fear of pain than from pain itself. We go to so many lengths to shield ourselves from pain, that we live in a perpetual state of tension.
Pain is inevitable.
We much change our relationship with pain.
We much accept that pain will come to happen in our lives and we need to prepare for fight, not flight.
Pain is also the path to change and growth. if we avoid pain entirely, we stagnate, and we don’t become better versions of ourselves.
Change is driven by pain.
Pain is a necessary catalyst for growth.
Pain is both positive and negative. Pain is a signal that something is off and needs attending to. The louder the pain the more attention we need to pay.
In the lonely journey that is the search for oneself, pain is your loyal companion.
Writing without judgment can be a truly transformative experience. By letting our unfiltered thoughts flow onto the page, we are able to process and understand them in a way that simply thinking about them might not allow. It’s amazing how often we think we know exactly what we’re thinking, only to realize that there’s so much more going on beneath the surface.
But it’s not just about understanding our own thoughts - the act of verbalizing them can also be incredibly clarifying. Suddenly, the muddled jumble of ideas in our heads starts to make a lot more sense. And by facing our own emotions head-on, we can gain valuable insights into the root causes of any problems we may be facing.
So, go ahead and grab a pen and paper (or your favorite writing app). Start a dialogue with yourself and see where it takes you. You might be surprised at what you uncover.
Writing shouldn’t entirely replace therapy for those who need it, but it can certainly be a powerful supplement to guided treatments.
And while journaling is a particularly effective form of writing for these purposes, any form of self-expression can be therapeutic. So don’t be afraid to let your creativity flow!
Note: This post was rewritten for clarity and style with help from ChatGPT. More details here.
D.E. is a way of doing. D.E. simply means doing whatever you do in the easiest most relaxed way you can manage, which is also the quickest and most efficient way, as you will find as you advance in D.E.
Burroughs’ story contains a fascinating idea for re-engineering our calendar:
The Colonel decides to make his own time. He opens a school notebook with lined papers and constructs a simple calendar consisting of ten months with twenty-six days in each month to begin on this day February 21, 1970, Raton Pass 14 in the new calendar. The months have names like old Pullman cars in America where the Colonel had lived until his eighteenth year… names like Beauacres, Bonneterre, Watford Junction, Sioux Falls, Pike’s Peak, Yellowstone, Bellevue, Cold Springs, Lands End dated from the beginning Raton Pass 14 a mild grey day.
D.E. introduces the idea of labeling common household objects:
He had discovered the simple and basic discipline of D.E. – Do Easy. It’s simple to do everything you do in the easiest and most relaxed manner you can achieve at the time you do it. He has become an assiduous student of D.E. Cleaning the flat is a problem in logistics. He knows every paper, every object, and many of them now have names.
D.E. also provides advice on organization:
You can start right now tidying up your flat, moving furniture or books, washing dishes, making tea, sorting paper. Consider the weight of objects. Exactly how much force is needed to get the object from here to there? Consider its shape and texture and function. Where exactly does it belong? Use just the amount of force necessary to get the object from here to there. […] Remember, every object has its place. If you don’t find that place and put that thing there, it will jump out at you and trip you or rap you painfully across the knuckles. It will nudge you and clutch at you and get in your way. Often such objects belong in the wastebasket but often it’s just that they are out of place.
Finally, D.E. is also a kind of mindfulness proclamation:
Everyday tasks become painful and boring because you think of them as WORK something solid and heavy to be fumbled and stumbled over. Overcome this block and you will find that DE can be applied to anything you do even to the final discipline of doing nothing. The easier you do it the less you have to do. He who has learned to do nothing with his whole mind and body will have everything done for him.
View the archives